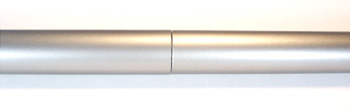
The end of each rod segment has a set screw for securing the splice. You'll find the set screw on the back of the rod approximately 2" from the end. The splice connector is a smaller diameter piece of rod, about 8" long. Slide the splice connector halfway into one rod segment and tighten the set screw. Repeat on the other rod segment. Rotate the rods such that the set screws are on the back, next to the wall. Once installed, only a thin seam remains which will be completely hidden behind the middle bracket, thus making the rod appear as a continuous, seamless rod.
We do recommend that the brackets line up with splice seams. This does three things:
1. It hides the seam (the seam is small yet visible if not behind a bracket).
2. It means that you will never have to slide the drapery over a seam.
3. It gives support to the joint. The splice connector holds the rod pieces together, but does not hold them "up".
Assembly Steps:
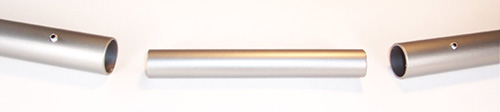
The end of each rod segment has a set screw for securing the splice. You'll find the set screw on the back of the rod approximately 2" from the end. The splice connector is a smaller diameter piece of rod, about 8" long.
Slide the splice connector halfway into one rod segment and tighten the set screw. Repeat on the other rod segment.
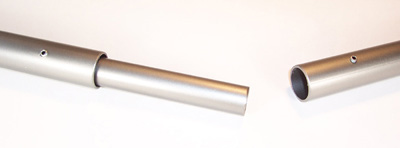
Rotate the rods such that the set screws are on the back, next to the wall. Once installed, only a thin seam remains which will be completely hidden behind the middle bracket, thus making the rod appear as a continuous, seamless rod.